1. Prerrequisitos:Antes de compilar las librerías de osgVP, necesitamos instalar algunas herramientas de desarrollo.
- SVN Client: te recomendamos el uso del cliente Tortoise SVN para Windows, disponible en: http://tortoisesvn.tigris.org/. Solo en el caso de descargar el código fuente disponible en el repositorio SVN.
- Descarga el último JDK de Java disponible en: http://java.sun.com. Te recomendamos que instales la última versión, sin embargo osgVP puede funcionar con el JDK 5 o superior.
- Apache Ant: Descarga la última versión disponible en: http://ant.apache.org/. Descomprime el zip y añade la carpeta "bin" a tu variable de entorno "PATH".
- Apache Maven: Descarga la última versión disponible en: http://maven.apache.org/. Descomprime el zip y añade la carpeta "bin" a tu variable de entorno "PATH". Asegúrate de que estás utilizando al menos la versión 2.0.10.
- CMake: es una utilidad para compilar sobre varias plataformas. Descarga el instalador para Win32 disponible en http://www.cmake.org/. No olvides marcar la casilla "Add CMake to the system PATH" durante la instalación.
- Microsoft Visual Studio 2008: nosotros desarrollamos y realizamos las pruebas sobre esta versión de Visual Studio, sin embargo, si no dispones de una licencia para este software puedes descargar la versión "express" de forma gratuita en "http://www.microsoft.com/express/Downloads/#2008-Visual-CPP".
- Eclipse: es una excelente plataforma para desarrollar proyectos en Java. Puedes utilizar otro software si lo deseas, sin embargo ya te damos los proyectos preparados para Eclipse. Descarga la última versión en http://www.eclipse.org/.
Te recomendamos que uses esta versión de Visual Studio para compilar osgVP pues ya proveemos de todas las dependencias necesarias. Por otro lado, es posible utilizar una versión más reciente siempre y cuando no olvides remplazar las librerías de Visual Studio por las nuevas en la carpeta de dependencias ".
depman". Esta carpeta se genera en tu directorio de usuario cuando Maven descarga o compila las librerías nativas del proyecto. Ten en cuenta que después ejecutar "
mvn clean" esta carpeta se elimina y necesitaras volver a copiar estos archivos. Se pueden utilizar también todos los compiladores soportados por CMake, sin embargo, no podemos garantizar una compilación sin errores.
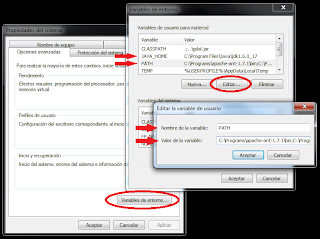
2. Comprueba tus variables de entorno:Ves a "
Propiedades del sistema" en tu "
Panel de Control" y haz click para editar las "
Variables de entorno". Primero, comprueba que la variable "
JAVA_HOME" apunta a la carpeta que contiene el JDK en lugar del directorio del JRE. Si la variable no existe, añádela a tus variables de entorno.
Después, comprueba que los directorios de binarios de CMake, Ant y Maven están incluidos en la variable "
PATH".
Posteriormente, prueba a ejecutar los siguientes comandos de consola para comprobar que las variables de entorno están asignadas correctamente:
java -version
ant -versionmvn -version
cmake --version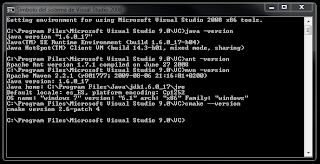
Si aparece algún error con estos comandos, una o más variables de entorno no están asignadas correctamente. Por favor, revísalas de nuevo.
3. Descargar el código fuente:- Desde el SVN:
Crea un nuevo directorio en tu disco duro llamado "
osgVP-2.2.0". Abre este directorio y haz click con el botón derecho en un espacio blanco. Selecciona la opción "
SVN Checkout" del menú contextual y escribe la URL de nuestro repositorio en la ventana "
Checkout Window":
https://svn.forge.osor.eu/svn/osgvp/branches/osgvp-2.2.0
En esta dirección se encuentra la última versión estable de las librerías de osgVP, pero puedes utilizar la dirección del trunk en su lugar: https://svn.forge.osor.eu/svn/osgvp/trunk. Ten en cuenta que la versión del trunk está en desarrollo y parte de la funcionalidad puede no estar disponible.
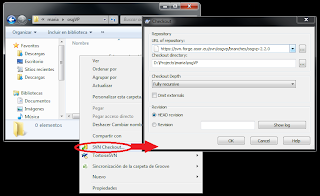
Comprueba que la ruta de "
Checkout directory" apunta al directorio "
osgVP-2.2.0". Pulsa el botón "
OK" y acepta el certificado permanentemente. Ahora, el cliente SVN descargará el código fuente de osgVP. Por otro lado, si estás utilizando un cliente SVN de consola, tan solo navega hasta el direcorio "
osgVP-2.2.0" y escribe la siguiente línea de comando:
svn co https://svn.forge.osor.eu/svn/osgvp/branches/osgvp-2.2.0.
- Desde fichero de fuentes:
Crea un nuevo directorio llamado "
osgVP-2.2.0". Descarga el último paquete de fuentes para Windows disponible en
http://forge.osor.eu/projects/osgvp/ en la sección de "
Ficheros" o bien directamente desde:
http://forge.osor.eu/frs/?group_id=177. Posteriormente, descomprime el paquete en el directorio "
osgVP-2.2.0".
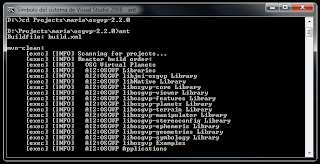
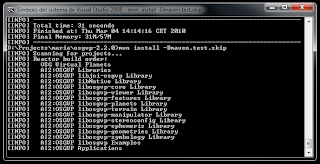
4. Compilar los fuentes:Abre el "
Símbolo del sistema de Visual Studio 2008" disponible en el "
Menú de Inicio > Programas > Microsoft Visual Studio 2008 > Visual Studio Tools". Esta consola configura las variables de entorno necesarias para compilar con Visual Studio. Ves al directorio "
osgVP-2.2.0" y ejecuta el comando "
ant". Este comando ejecuta las acciones definidas en el fichero "
build.xml"; limpiando los directorios de trabajo, descargando las dependencias, compilando los fuentes y construyendo los proyectos de Eclipse.
Se recomienda usar "
ant" para compilar por primera vez las librerías de osgVP, pues este comando realiza todos los pasos de compilación necesarios. En lo sucesivo, puedes utilizar el comando "
mvn install" en lugar de "
ant" para recompilar solo el código fuente. Algunos test pueden estar desactualizados, produciendo errores de compilación. Para saltar los test utiliza el comando "
mvn install -Dmaven.test.skip".
Otros comandos de gran utilidad que puedes utilizar son los siguientes. Ten en cuenta que los tres primeros se ejecutan automaticamente al utilizar el comando "
ant" y no es necesario ejecutarlos después.
- mvn clean: elimina los archivos generados previamente. Después de utilizar este comando es necesario volver a compilarlo todo de nuevo.
- mvn install -Dmaven.test.skip: compila los fuentes (incluyendo los ficheros nativos) y copia las librerías en el repositorio local de maven (en este caso .depman), sin realizar los test unitarios.
- mvn eclipse:eclipse: genera automáticamente los proyectos de Eclipse. Después de ejecutar este comando solo tienes que importar los proyectos desde Eclipse.
- mvn eclipse:clean: elimina los proyectos de Eclipse generados con Maven.
- mvn test: ejecuta los test unitarios.
- mvn install assembly:assembly -Dmaven.test.skip: compila las librerías sin los test y crea un zip para su distribución. Este fichero está disponible en el directorio "osgVP-2.2.0 > build > product".
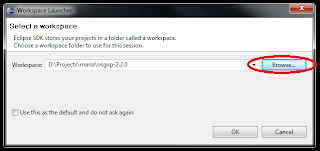
5. Importar los proyectos desde Eclipse:Abre Eclipse y selecciona la carpeta "
osgVP-2.2.0" como tu espacio de trabajo.
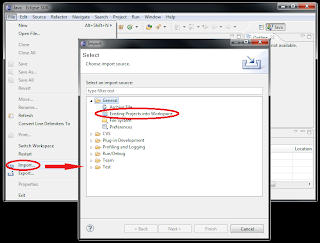
Cierra la ventana "
Welcome" y selecciona "
File > Import". Después, selecciona "
General > Existing Projects into Workspace" en la ventana "
Import" y pulsa "
Next".
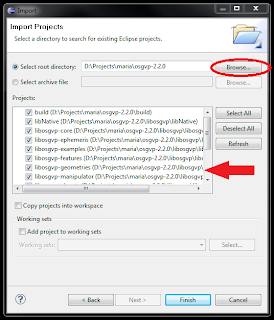
Pulsa "
Browse" en "
Select root directory" o escribe directamente la ruta del directorio "
osgVP-2.2.0". Inmediatamente aparecerán los proyectos de osgVP en la lista "
Projects". Finalmente pulsa el botón "
Finish".
Después de importar los proyectos, Eclipse los compilará automáticamente.
6. Lanzar los ejemplos:Hemos creado una configuración preparada ya para ejecutar los ejemplos de osgVP. Desplega el menú "
Run" y selecciona "
Run Configurations". Después despliega "
Java Application" y selecciona "
Examples Launcher".
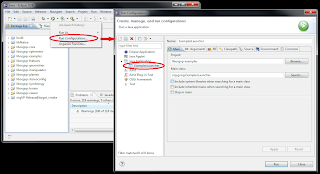
La aplicación "
ExamplesLauncher" está lista para ser ejecutada pero primero debes especificarle donde se encuentran las librerías nativas de osgVP. Selecciona la pestaña "
Environment" y edita la variable "
PATH". Debes cambiar el valor de la variable por la ruta completa a las librerías nativas que se encuentran en el directorio "
.depman":
Windows XP: c:\\Document and Settings\\{username}\\.depman\\bin
Windows Vista o 7: c:\\Users\\{username}\\.depman\\bin
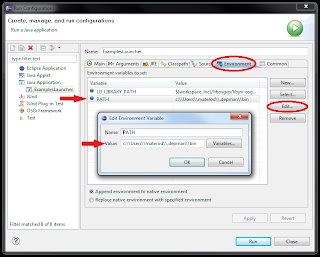
Ten en cuenta que el caracter "\" es un caracter especial en Windows y debes poner "\\" para escaparlo. Finalmente pulsa "
Run" y la aplicacion de ejemplos se mostrará. Ahora puedes probar los ejemplos.
 7. Resolución de problemas:
- Tengo el JDK de Eclipse u otro instalado en el sistema. Necesito instalar el de SUN?
Sí, necesitas instalar el JDK de SUN para Java y añadir la variable de entorno "JAVA_HOME" con el directorio de este JDK.
- Aparecen algunos errores de compilación cuando ejecuto los comandos "mvn install -Dmaven.test.skip" o "ant".
Prueba a limpiar tu espacio de trabajo con "mvn clean". Comprueba que has puesto todas las variables de entorno necesarias como toca y compila de nuevo. Si tenías otra versión de OpenSceneGraph instalada en el sistema, borralá de cualquier variable de entorno antes de compilar osgVP.
- Cuando ejecuto "mvn test" me salen errores con los test JUnit.
No te preocupes, algunos test puede estar desactualizados o bien, necesitan un entorno especial para ser ejecutados (no funcionan correctamente desde la consola).
- Cuando importo los proyectos de osgVP en el Eclipse, solo aparece "build" y "osgVP-Release@target-cmake" en la lista de proyectos.
Tienes que compilar y crear los proyectos de osgVP antes de importarlos con Eclipse. Abre la línea de comandos de Visual Studio 2008 y ejectua "mvn eclipse:eclipse".
- Los proyectos de Eclipse tiene errores.
Si has deshabilitado la opción de "Build Automatically" en Eclipse, necesitaras compilar los proyectos desde "Projects > Build All".
- Obtengo este error o uno parecido al lanzar los ejemplos: "Unable to locate win32/bin/jniosgvpviewer.dll in class path".
La variable de entorno "PATH" no está correctamente configurada. Sigue las instrucciones del paso "6. Lanzar los ejemplos" y comprueba la variable "PATH".
- He realizado algunas modificaciones en el código de osgVP, ¿Cómo puedo compilarlo de nuevo?
Ejecuta el comando "mvn install -Dmaven.test.skip".
1. Prerequisites:Before compile osgVP libraries, you need to install some development tools.
- SVN Client: we recommend you to use the Tortoise SVN Client for Windows. It is available at: http://tortoisesvn.tigris.org/. Only you need it for download source code from SVN repository.
- Download the latest version of Java SDK available at: http://java.sun.com. We recommend installing the latest version, but osgVP can run with JDK 5 or higher.
- Apache Ant: Download the latest version of Ant available at: http://ant.apache.org/. Then, unzip the package and add the "bin" directory to your "PATH" environment variable.
- Apache Maven: Download the latest version of Maven available at: http://maven.apache.org/. Then, unzip the package and add the "bin" directory to your "PATH"environment variable. You should also make sure you are using at least version 2.0.10.
- CMake: is a utility to cross platform compilation. Download the Win32 installer available at http://www.cmake.org/. Don't forget to check "Add CMake to the system PATH" during installation.
- Microsoft Visual Studio 2008: we are developing and testing with this version of Visual Studio, however if you don't have a license for this software, you can download the "express" version for free at http://www.microsoft.com/express/Downloads/#2008-Visual-CPP.
- Eclipse: is an excellent editor for Java development. You can use other software but we provide pre-built Eclipse projects for our libraries. Download the latest version of Eclipse at http://www.eclipse.org/.
We strongly recommend you use this version of Visual Studio to compile because we provided all the necessary dependencies. On the other hand, it is possible to use newer versions of Visual Studio whenever do not forget to replace Visual Studio libraries with new ones in ".
depman" directory. This folder is generated on your user home when Maven download or build osgVP native libraries. After "
mvn clean" command, this directory is removed and you need to replace Visual Studio libraries again. Other compilers available for CMake can be used to compile osgVP however cannot guarantee error free compilation.
2. Check your environment variables:Go to "
System Properties" on your "
Control Panel" and click on "
Environment Variables". First, check if "
JAVA_HOME" variable is set to your JDK directory instead of a JRE directory. If the variable doesn't exist add to your environment variables.
Second, check if binaries directories for CMake, Ant and Maven are included on your "
PATH" environment variable.
Then, try execute the following commands in your command prompt to verify that the environment variables are set correctly:
java -versionant -versionmvn -versioncmake --versionIf you get some errors with these commands, one or more of the environment variables aren't correctly added. Please check again.
3. Download the source code:- Download from SVN:
Create a new directory for osgVP in your hard drive called "
osgVP-2.2.0". Open the directory and right-click on blank surface. Then select the option "
SVN Checkout" from the contextual menu. Write the URL of our repository at "
Checkout Window":
https://svn.forge.osor.eu/svn/osgvp/branches/osgvp-2.2.0
This URL is the latest stable version of osgVP, but you can use the trunk instead of the 2.2.0 version: https://svn.forge.osor.eu/svn/osgvp/trunk. Note that the trunk version is under development and some functionality will not be available.
Check if "
Checkout directory" points to "
osgVP-2.2.0" directory. Press "
OK" and accept the certificate permanently. Now the SVN client downloads the osgVP source code. By the way, if you are using a command line SVN client, only navigate to "
osgVP-2.2.0" and write the following command:
svn co https://svn.forge.osor.eu/svn/osgvp/branches/osgvp-2.2.0 .
- Download from package:
Create a new directory called "
osgVP-2.2.0". Download the latest source code package for windows available at Files section from:
http://forge.osor.eu/projects/osgvp/ or directly from:
http://forge.osor.eu/frs/?group_id=177. Then, uzip the source files on "
osgVP-2.2.0" directory.
4. Compile sources:Open the "
Visual Studio 2008 Command Prompt" available at "
Start Menu > Programs > Microsoft Visual Studio 2008 > Visual Studio Tools". This command prompt set all necessary variables to compile with Visual Studio. Change directory to "
osgVP-2.2.0" and execute "
ant"command. This command runs the actions of "
build.xml"; cleaning the workspace, downloading dependencies, compiling sources and building Eclipse projects.
First time you compile the osgVP libraries is recommended to use "
ant" command because this command make all necessary compilation steps. Next time, you can use "
mvn install" instead of "
ant" to compile source. Some test could be out of date producing errors in compilation. To skip test use the command "
mvn install -Dmaven.test.skip".
There are useful commands that you can use in osgVP source directory. Notice that "
ant" command executes the first three commands automatically.
- mvn clean: clean all previous build files. After use this command you need to compile all again.
- mvn install -Dmaven.test.skip: compile all the source code (including native libraries) and copy them into your local maven repository, skipping test.
- mvn eclipse:eclipse: build Eclipse projects. After run this command you only need to import the projects with Eclipse.
- mvn eclipse:clean: clean all previous Eclipse projects.
- mvn test: run unit test.
- mvn install assembly:assembly -Dmaven.test.skip: create a binary distribution of osgVP libraries. The distribution file is available at "osgVP-2.2.0 > build > product" directory.
5. Import projects with Eclipse:Open Eclipse and select "
osgVP-2.2.0" folder like your workspace.
Close "
Welcome" tab and select "
File>Import". Then, select "
General > Existing Projects into Workspace" at "
Import window" and click "
Next".
Click on "
Browse" button on "
Select root directory" or write your path to "
osgVP-2.2.0" folder. Some projects must appear on "
Projects" list. Finally, press "
Finish".
Eclipse compile all projects automatically after import step.
6. Run the examples:We provide a run configuration for osgVP examples. Press pull-down "
Run" menu and select "
Run Configurations". Then pull-down "
Java Application" and select "
Examples Launcher".
The "
ExamplesLauncher" is ready for use but you need to set the path of the osgVP native libraries before. Select "
Environment" tab and edit the "
PATH" variable. You must set the value of this variable to your "
.depman" directory:
Windows XP: c:\\Document and Settings\\{username}\\.depman\\bin
Windows Vista or 7: c:\\Users\\{username}\\.depman\\bin
Notice that "\" character is a special character on Windows and you must set "\\" to escape it. Finally press "
Run" and the examples window is showed. Now, you can test osgVP examples.
7. Troubleshooting- I have other JDK installed in the system like Eclipse JDK. Do I need to install the SUN JDK?
Yes, you have to install SUN Java JDK in your system and set the "JAVA_HOME" environment variable to this JDK.
- I get some errors during compilation process when I run "mvn install -Dmaven.test.skip" or "ant" command.
Try to clean your workspace with "mvn clean" command. Check if you set all the environment variables and compile again. If you have other version of OpenSceneGraph libraries installed in your system, remove them from any environment variable before compile osgVP.
- I try to run "mvn test" command and I get errors in JUnit test.
Don't worry, some test are out of date or need a special environment to be executed(don't work from command prompt).
- When I import osgVP projects into Eclipse, there are only "build" and "osgVP-Release@target-cmake" in the projects list.
You have to compile and build osgVP projects before import them with Eclipse. Open the Visual Studio 2008 Command Prompt and run "mvn eclipse:eclipse".
- The osgVP Eclipse projects have some errors.
If you have the "Build Automatically" feature disabled on Eclipse, you need to build all projects with "Projects > Build All".
- I launch the examples and get this error: "Unable to locate win32/bin/jniosgvpviewer.dll in class path" or similar.
Your "PATH" environment variable is not set correctly. Follow the instructions of "6. Run examples" and check the "PATH".
- I do some modifications in the osgVP source code, how can i build it again?
Use "mvn install -Dmaven.test.skip" command.


